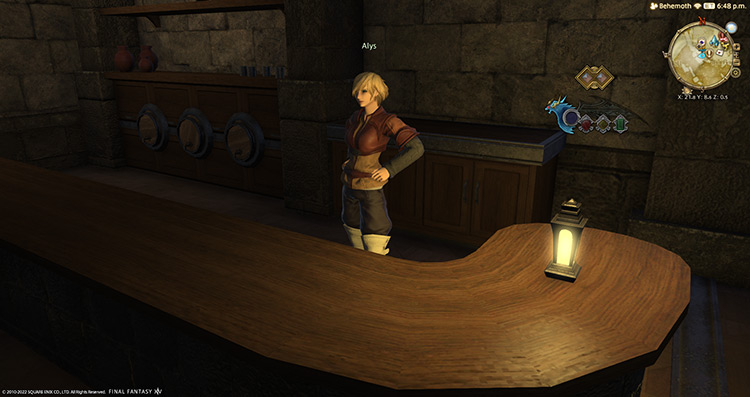
You can unlock The Minstrel’s Ballad: Nidhogg’s Rage, also known as Nidhogg EX, by accepting the quest “Nidhogg’s Rage” from Alys in Mor Dhona (X:21.8, Y: 8.6).
“Nidhogg’s Rage” has some prerequisite quests you need to complete before it can be accepted. This includes the final Main Scenario Quest (MSQ) of patch 3.3 of the Heavensward expansion.
Let’s go through the unlocking requirements + strategies for every phase of this trial.
Step-by-Step Unlocking Guide
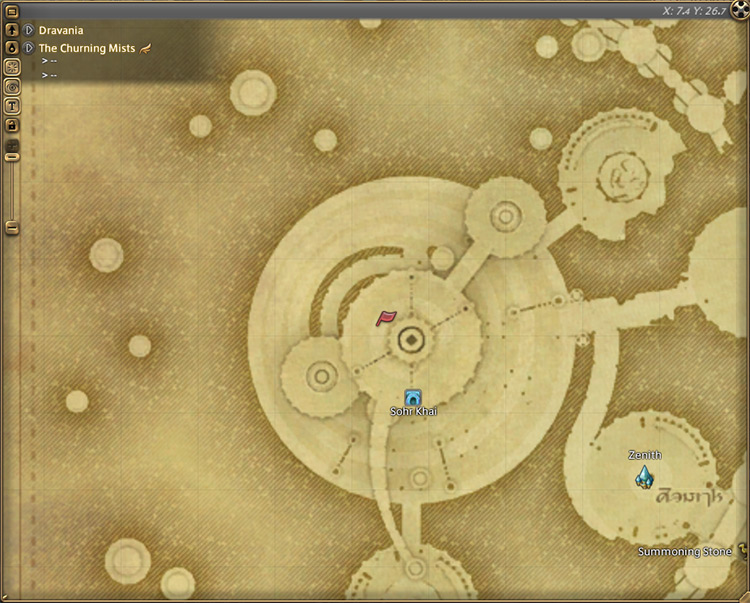
- Complete the MSQ “An End to the Song” from Aymeric in The Churning Mists (X:7.4, Y:26.7)
- Complete the MSQ “Litany of Peace” from Aymeric in Foundation (X:13.6, Y:11.2)
- Accept the quest “Nidhogg’s Rage” from Alys in Mor Dhona (X:21.8, Y: 8.6)
- Talk to the Wandering Minstrel in Mor Dhona (X:21.8, Y: 8.7)
Detailed Unlocking Guide
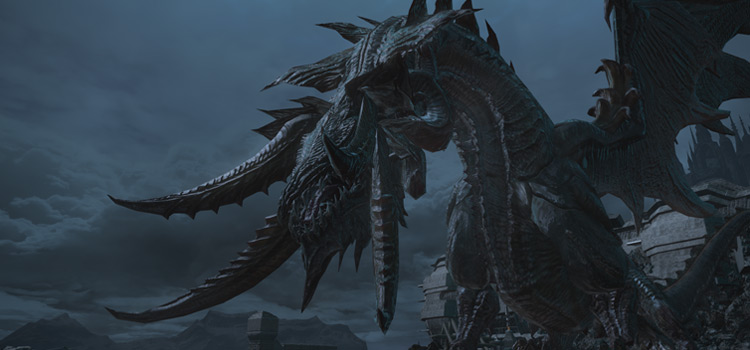
Similar to every trial in the game, you’ll need to unlock Nidhogg’s story version first before you can tackle his extreme version.
Accept the Main Scenario Quest “An End to the Song” from Aymeric in The Churning Mists (X:7.4, Y:26.7) to continue.
In this quest, you’ll unlock the trial “The Final Steps of Faith,” where you’ll face off against Nidhogg to determine the fate of Ishgard and Dravania.
This eight-person trial requires an average item level of 205 and a level 60 Disciple of War or Magic job to enter. Defeat Nidhogg to complete the quest.
Afterward, continue with the main story until you reach the quest “Litany of Peace”. This quest can be accepted from Aymeric in Foundation (X:13.6, Y:11.2) and it includes a 15-minute cutscene.
Make sure you have enough time to go through it! This quest puts the finishing touches to the Dragonsong War Main Scenario Questline and shows a glimpse into the future of the Ishgardian people.
With the MSQs out of the way, you can now proceed with unlocking Nidhogg EX.
Head to Mor Dhona (X:21.8, Y: 8.6) in the Seventh Heaven Bar.
Alys should now have a quest called “Nidhogg’s Rage” that you can accept.
The Seventh Heaven Bar’s resident minstrel has been causing headaches for Alys once again, ever so eager to hear tales of your adventures.
Put the barkeeper’s mind to ease by talking to The Wandering Minstrel in Mor Dhona (X:21.8, Y: 8.7).
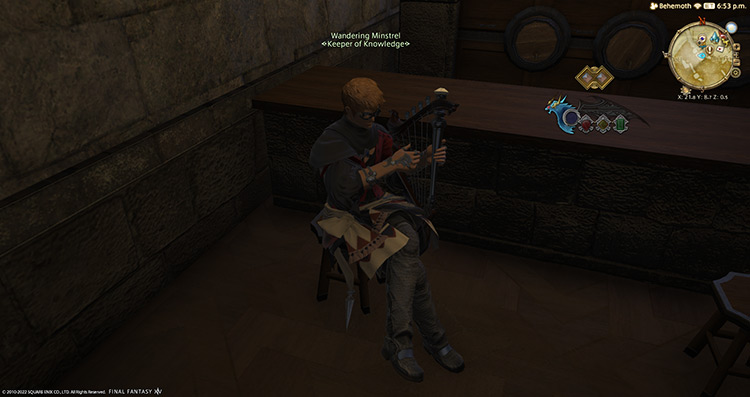
Your biggest fan seems to have heard the rumor of your remarkable achievement in Ishgard and will plead with you to tell him the story. After recalling your tale, the minstrel will sing your praises for the bar to hear, letting it be known that the dragon Nidhogg is no more.
Once the minstrel finishes his performance, The Minstrel’s Ballad: Nidhogg’s Rage will be unlocked.
To enter the trial, you’ll need at least an average item level of 220 and a level 60 Disciple of War or Magic job.
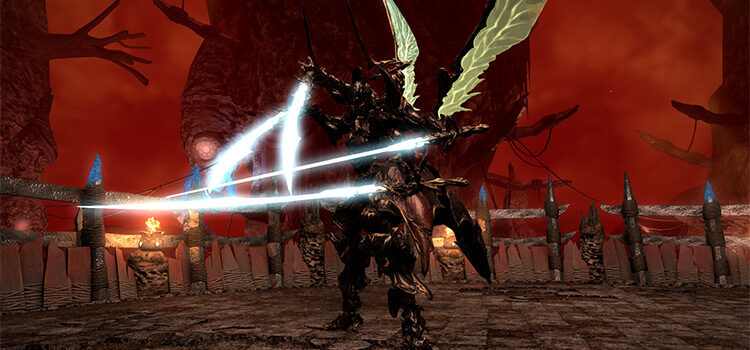
Nidhogg EX is a fast-paced trial with tons of mechanics to learn about. Let’s go through each of them down below:
Trial Boss Guide: Nidhogg (Extreme)
Since this trial being released way back in patch 3.3, it can easily be soloed when you enter it unsynced with a level 90 or above character. Using tank jobs would be the safest and easiest option, but it can be done with healer and DPS jobs as well.
You’ll need to tank through a 50000 damage self-destruct attack if you can’t skip Phase 4 since you won’t be able to destroy “Nidhogg’s Claw” alone. To skip Phase 4, you’ll need to burn the boss down below 40% HP before Phase 3’s rotation ends.
Otherwise, just hit the boss as hard as you can.
If you want to do the fight while synced, here are the mechanics:
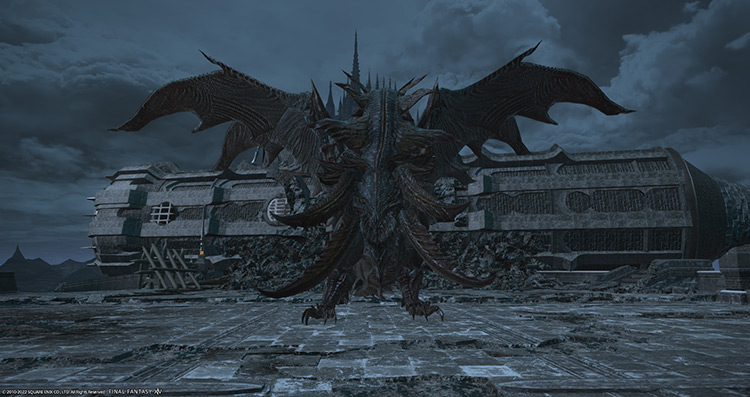
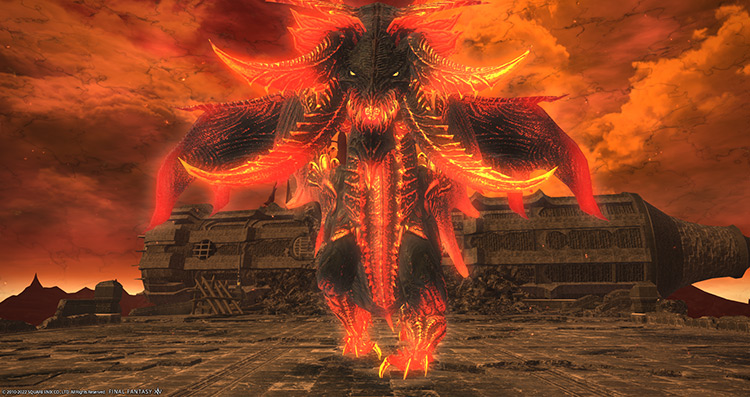
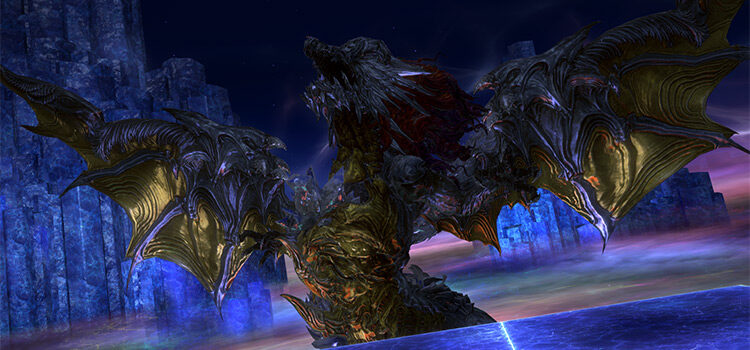
Phase 1: Dragon Form
Rotation:
The Scarlet Whisper > Deafening Bellow > The Scarlet Whisper > Cauterize + Horrid Roar x2 > Touchdown > The Scarlet Whisper > Deafening Bellow > The Scarlet Whisper > Hot Wing or Hot Tail > Horrid Roar > Hot Wing or Hot Tail > Deafening Bellow > Repeat until 80% HP.
The boss should be tanked in the center of the arena while the rest of the party stacks behind him. Assign spots to bait “Horrid Roar” AoEs to minimize overlap.
- The Scarlet Whisper: A cleaving tankbuster attack on the primary target. Face the boss away from the party to avoid unnecessary damage. Use damage reduction skills and heal through the attack.
- Deafening Bellow: A arena-wide AoE attack. Mitigate and heal through the damage.
- Horrid Roar: The boss will jump up and target four players with black circle AoE markers. Players hit by these AoEs will be inflicted with “Hysteria” debuffs, causing them to lose control of their characters for a few seconds. Immediately after, the targeted players will be marked for more circle AoEs, dealing moderate and unavoidable damage. To handle this mechanic, have the party stack in the center of the room to bait the AoEs in one spot, then spread out to avoid overlapping damage.
- Cauterize: The boss will jump to one edge of the arena, preparing for an attack. Then, he’ll fly across, spewing fire in a large column AoE on one half or the middle of the arena. This can happen more than once depending on the phase, so always check where the boss is and make sure you’re not in his path.
- Touchdown: After the boss finishes using “Cauterize,” he’ll drop back down in the middle of the arena, dealing room-wide AoE damage. Mitigate and heal through the attack.
- Hot Wing: The boss’ wings will cover his flanks with fire, dealing high damage to anyone caught in the attack. “Hot Wing” also applies a stacking “Burns” DoT for 30 seconds. Move in front or behind the boss to dodge.
- Hot Tail: The boss will spin forward, covering his front and back with fire. Similar to “Hot Wing,” this attack also applies a stacking “Burns” DoT for 30 seconds. Move to the boss’ flanks to avoid getting hit.
Phase 2: Shadow Mobs
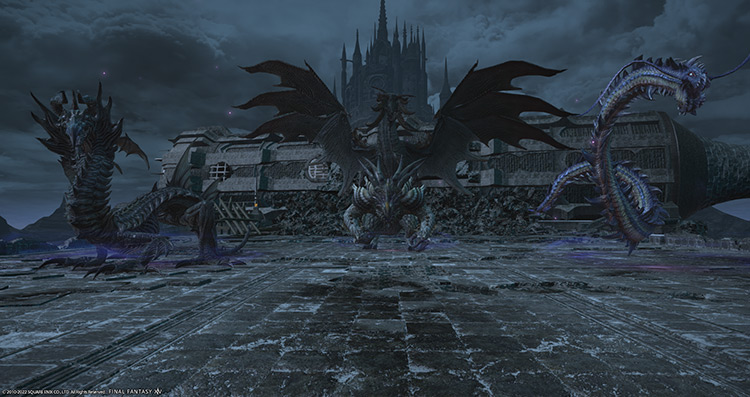
Rotation:
Summon Shadow Brobinyak + Shadow Falak + Shadow Dragon > Mortal Chorus > Final Chorus.
Pull the Brobinyak and Falak away from each other. The Dragon can’t be tanked and will move around the room targeting random players. Avoid its attacks to prevent DPS loss.
- Shadow Brobinyak: A mob that applies a stacking “Physical Vulnerability Up” and a “Disease” debuff on the primary target. The main tank should face this mob away from the party and kill it first.
- Shadow Falak: A mob that applies a stacking “Magic Vulnerability Up” debuff. The off-tank should pick this mob up until the Brobinyak dies. Then perform a tank swap with the main tank to avoid excessive debuff stacks while the rest of the party finishes it off.
- Shadow Dragon: This mob can’t be tanked, and all of its attacks are non-telegraphed. Most of its attacks also apply “Damage Down” debuffs, so avoid them as much as possible. Kill this mob last.
- Serpent’s Apple (Shadow Brobinyak): A non-telegraphed frontal cone AoE on the primary target that applies a stacking “Physical Vulnerability Up” debuff. This debuff lowers the target’s physical defense. Since “Serpent’s Apple” is a physical attack, having three stacks of this debuff will be fatal if applied on the same target.
- Original Sin (Shadow Brobinyak): Once the Brobinyak applies a third “Physical Vulnerability Up” debuff on its primary target, it’ll also apply a “Disease” debuff on its target. This debuff reduces the target’s movement speed and healing received. Ideally, the Brobinyak should be dead before it uses “Original Sin,” but the tank can use their invulnerability skill for the third stack to survive.
- Electric Predation (Shadow Falak): A non-telegraphed frontal cone AoE on the primary target that applies a stacking “Magic Vulnerability Up” debuff. Similar to “Serpent’s Apple,” “Electric Predation” will be fatal at three stacks on the same target.
- Ripper Claw (Shadow Dragon): A non-telegraphed frontal cleave on the dragon’s primary target that applies a “Damage Down” debuff to anyone hit. Move behind the dragon to dodge.
- Fireball (Shadow Dragon): The dragon will arch its body back and spit a large fireball on the player farthest from it. This fireball also applies a “Damage Down” debuff. Have a ranged DPS or healer stand farthest from the dragon to bait the fireballs.
- Bone Shaker (Shadow Dragon): A room-wide AoE attack that applies a “Vulnerability Down” debuff to everyone. Mitigate and heal through the damage. Getting hit by “Fireball” or “Ripper Claw” while having this debuff will likely kill you.
- Mortal Chorus: After the Shadow mobs are killed, the boss will transform into the Azure Dragoon and use “Mortal Chorus.” This attack will knock players back with a room-wide AoE attack and remove all the “Vulnerability Up” debuffs from the Shadow Dragon.
- Final Chorus: Immediately after “Mortal Chorus,” the boss will raise his lance and cast “Final Chorus.” This attack deals room-wide AoE damage based on the number of Shadow mobs that survive the phase. Kill all the Shadow mobs as soon as possible, or your party will likely wipe.
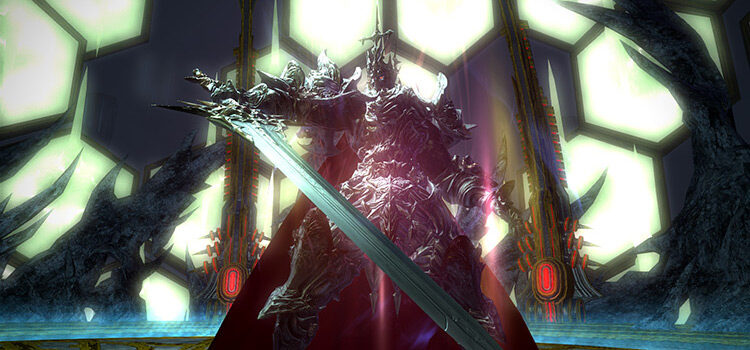
Phase 3: Azure Dragoon Form

Rotation:
Drachenlance x2 > High Jump > Geirskogul + Soul Tether > Ala Morn > Drachenlance.
Similar to Phase 1, tank the boss in the center to give the party more space to bait incoming AoE puddles. These mechanics will be repeated in upcoming phases.
- Drachenlance: A cleaving frontal attack on the primary target. Face the boss away from the party and heal through the damage.
- High Jump: Four players will be marked with dark red circle AoEs. These AoE markers will drop AoE puddles after some time, applying bleeding DoTs to anyone caught in them. Affected players should spread out toward the southern portion of the arena, wait for the puddles to drop, then move back to the center.
- Geirskogul: Four players will be targeted with “Geirskogul” column attacks. These column attacks also apply bleeding DoTs. Move out of these AoEs immediately.
- Soul Tether: During “Geirskogul,” a fifth player will be targeted with a purple “Soul Tether” that will explode after some time. This tether deals high damage and can be fatal to anyone but the tanks. The off-tank should look for the affected player, grab the tether away from them, and bait the explosion away from the party.
- Ala Morn: A strong tankbuster on the primary target. Mitigate and heal through the attack.
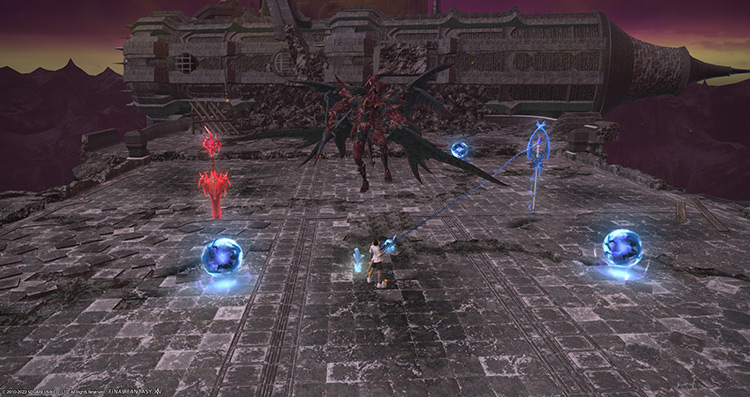
Phase 4: Nidhogg’s Fang and Claw
Rotation:
Nidhogg’s Fang + Nidhogg’s Claw Tethers > Ala Morn > Eye of the Tyrant > Nidhogg’s Fang and Nidhogg’s Claw Tethers > Ala Morn x2 > Drachenlance.
The boss will throw his weapons to the ground, creating two targetable mobs. As shown in the rotation, tethers will reapply after “Eye of the Tyrant,” so always pay attention to the weapon you’re tethered to.
- Nidhogg’s Fang (Blue weapon): The blue Fang weapon will attach blue tethers to three random players. This weapon can be damaged normally, but if the players tethered to the Fang take any damage, the Fang heals itself. Blue-tethered players should avoid getting hit by any attacks (“Flare Star” orbs and “Eye of the Tyrant” stacking AoE). If the main tank is tethered to the Fang, the off-tank should immediately perform a tank swap.
- Nidhogg’s Claw (Red Weapon): The red Claw weapon will attach red tethers to three random players. The Claw can only be damaged if the red-tethered players take damage. Red-tethered players should run towards the blue “Flare Star” orbs around the arena and stack with the affected player for “Eye of the Tyrant.”
- Flare Star: Blue orbs will spawn around the arena. Touching these orbs will make them explode, dealing point-blank AoE damage. Red-tethered players should run toward these orbs to damage the Claw.
- Eye of the Tyrant: A random untethered player will be targeted with a stacking AoE marker. Only red-tethered players should stack with the affected player. Mitigate and heal through the attack.
- Self-destruct (Fang and Claw): Both weapons will cast “Self-destruct” as soon as they spawn, dealing 50000 damage each if allowed to explode. These attacks act as a DPS check, so kill both weapons before they explode, or the party will wipe.
Phase 5: Darkdragon Dive Towers
Rotation:
Darkdragon Dive > High Jump + Soul Tether > High Jump + Geirskogul > Super Jump > Drachenlance > Ala Morn > Drachenlance > Bloodrage.
- Darkdragon Dive: Four towers will spawn around the arena and explode after some time. Each tower needs at least one player standing on it to mitigate incoming damage.
- Super Jump: A proximity-based AoE marker near the end of the “Darkdragon” tower phase. Move away from the marker, then heal through the attack.
- Bloodrage: A room-wide AoE attack signaling the transition to the final phase. Mitigate and heal through the damage.
This phase can be tricky with so many incoming attacks all at once.
Here’s a quick breakdown of what to do with each combination of mechanics as they appear:
- Have both tanks stand on the northeast and northwest towers, and two DPS players stand on the southwest and southeast towers.
- Bait the healer “High Jump” markers to the northwest and northeast corners of the arena.
- Run out of the “High Jump” DoT puddles.
- Have the tanks grab the tethers away from the healers.
- Move the tethers away from the group until they explode.
- Bait four more “High Jump” markers on the edges of the arena.
- Run out of the “High Jump” DoT puddles.
- Dodge four “Geirskogul” column attacks.
- Run away from the “Super Jump” proximity marker.
- Mitigate and heal through “Bloodrage” and “Touchdown.”
Phase 6: Fire Dragon Form + Sable Price (Pattern 1)
Rotation:
Cauterize > Horrid Roar > Akh Morn > Sable Price (Pattern 1) > Horrid Roar > Hot Wing > Akh Morn > The Scarlet Whisper > Deafening Bellow > The Scarlet Whisper > Deafening Bellow > Sable Price (Pattern 2) > Horrid Roar > Hot Tail > Deafening Bellow > Akh Morn > The Scarlet Whisper > Deafening Bellow > The Scarlet Whisper > Deafening Bellow > Repeat from Sable Price (Pattern 1).
- Bitter Hate: The boss will apply a stacking DoT debuff on the primary target. This debuff will deal 50000 damage once the debuff reaches eight stacks. The main tank should perform a tank swap with the off-tank at four or five stacks to avoid instant death.
- Akh Morn: A random player will be targeted with a stacking AoE marker. “Akh Morn” will start with five total hits and add an extra hit with each cast until it maxes out at seven hits. Stack with the affected player, then mitigate and heal through the damage.
- Sable Price: Three sets of fire orbs will spawn in specific areas of the arena. Each set of orbs will explode after some time, shooting column attacks toward their cardinal directions. These column attacks will also apply a burning DoT. Getting hit by two orb attacks in a row will most likely kill you. “Sable Price” orbs have two spawning patterns you need to familiarize yourself with.
- Sable Price (Pattern 1): Two sets of fire orbs will spawn on opposite corners, followed by another set in the center. Stay in the center until the corner orbs explode, then move out.
- Sable Price (Pattern 2): The three sets of fire orbs will spawn one at a time, with the center orbs always spawning first. Move to the corner where the fire orbs spawned last, wait for the center orbs to explode, then run to the center.
“Sable Price” orb explosions will happen with other mechanics at the same time, so let’s go through what you need to do to handle these mechanics:
- Bait “Horrid Roar” AoEs and markers on the edges while dodging “Cauterize.”
- Stack in the center for Akh Morn.
- As the first pattern of “Sable Price” appears, bait “Horrid Roar” AoEs near the main tank to the north.
- Run back to the center to dodge the “Horrid Roar” AoEs and the exploding “Sable Price” line attacks.
- Drop the “Horrid Roar” markers on the boss’ flanks. Have two targeted players on each flank to avoid overlap.
- Stack in the center for Akh Morn and perform a tank swap.
- Heal through two “The Scarlet Whisper” and two “Deafening Bellow” attacks.
- Move to the corner of the last set of “Sable Price” orbs that spawned for the second pattern.
- Bait “Horrid Roar” AoEs to the very edge of the corner.
- Avoid overlapping the “Horrid Roar” markers as you move out of “Horrid Roar” AoEs. Don’t move to the center prematurely, or you’ll die to “Sable Price.”
- Run to the boss’ flanks to dodge “Hot Tail.” Alternatively, you can stack in the middle and just heal through the attack.
- Stack in the center for Akh Morn and perform a tank swap.
- Heal through two “The Scarlet Whisper” and two “Deafening Bellow” attacks.
After step 13, the mechanics will repeat from step 3 until the boss dies or the party wipes.
Rewards
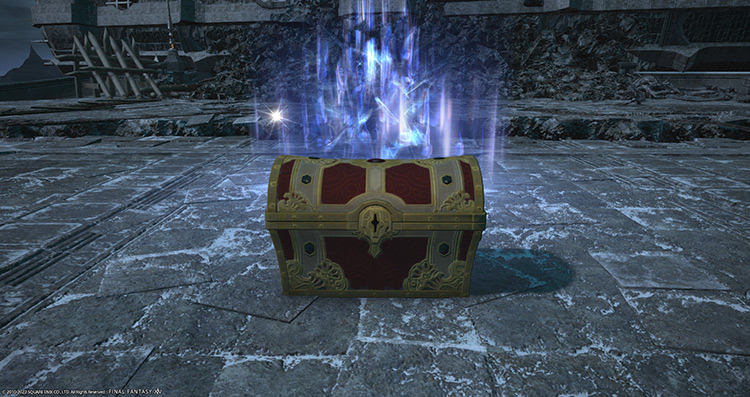
Horde Totems can be traded for weapon loot (10 fragments) or the Dark Lanner Whistle (99 fragments) with Bertana in Idyllshire (X:5.9 Y:5.2).
- 20 Allagan Tomestones of Poetics
- Nidhogg Triple Triad Card (not guaranteed)
- Horde Totem (1 per clear)
| Name | Type | Rarity |
|---|---|---|
| Horde Codex | Book | Blue (Primal Gear) |
| Horde Grimoire | Book | Blue (Primal Gear) |
| Horde Bow | Bow | Blue (Primal Gear) |
| Horde Cane | Cane | Blue (Primal Gear) |
| Horde Daggers | Daggers | Blue (Primal Gear) |
| Horde Handgonne | Firearms | Blue (Primal Gear) |
| Horde Knuckles | Fist Weapon | Blue (Primal Gear) |
| Horde Axe | Greataxe | Blue (Primal Gear) |
| Horde Guillotine | Greatsword | Blue (Primal Gear) |
| Horde Katana | Katana | Blue (Primal Gear) |
| Horde Spear | Polearm | Blue (Primal Gear) |
| Horde Rapier | Rapier | Blue (Primal Gear) |
| Horde Shield | Shield | Blue (Primal Gear) |
| Horde Rod | Staff | Blue (Primal Gear) |
| Horde Star Globe | Star Globe | Blue (Primal Gear) |
| Horde Blade | Sword | Blue (Primal Gear) |
| Nidhogg’s Scale | Crafting material | Basic |
| Faded Copy of Revenge of the Horde | Orchestrion Roll | Basic |
| Dark Lanner Whistle | Other | Basic |
| Horde Weapon Coffer | Other | Basic |
-
Final Fantasy XIV
- FFXIV Minstrel’s Ballad: Nidhogg’s Rage – Unlocking + Trial Guide
Related Posts:
 FFXIV The Minstrel’s Ballad: Thordan’s Reign – Unlock + Trial Guide
 FFXIV The Minstrel’s Ballad: Shinryu’s Domain – Unlock + Trial Guide
 FFXIV Emanation (Extreme): How To Unlock + Trial Guide
 FFXIV The Jade Stoa (Extreme): How To Unlock + Trial Guide
 Zurvan EX Unlock & Trial Guide – FFXIV Containment Bay Z1T9 (Extreme)
 Sophia EX Unlock & Trial Guide – FFXIV Containment Bay P1T6 (Extreme)
 FFXIV Thok ast Thok (Extreme): How To Unlock + Trial Guide
 FFXIV Wreath of Snakes (Extreme): How To Unlock + Trial Guide