This post may contain affiliate links. If you buy something we may get a small commission at no extra cost to you. (Learn more).
Faruzan is a niche Anemo DPS support – and she’s absolutely great at this role. She basically offers Anemo damage increase, resistance shred, and crowd control all in a single slot. But much of her potential is locked behind constellations, so Faruzan is not very good at C0 and she’s much better past C2.
This is because her kit issues – mostly energy problems – are solved by her constellations.
She’s still functional at C0, but constellations are highly recommended. They’re massive quality-of-life upgrades.
And in this case, using a C0 Faruzan is not that far from just using any other buffer/healer/damage dealer with your Anemo DPS. She only becomes the better option past C2.
Bu this is based on meta only. So if you like Faruzan regardless of her power level, don’t let this stop you from playing her.
Faruzan is currently the only dedicated Anemo DPS support in-game – it’s her niche and main role. This is thanks to the Anemo resistance shred and damage bonus that she provides to teammates.
Her kit is basically meant to buff units like Wanderer, Xiao, and DPS Heizou.
She’s able to significantly increase their personal damage outputs, especially with her C6.
Faruzan Weaknesses
1. High Energy Requirements
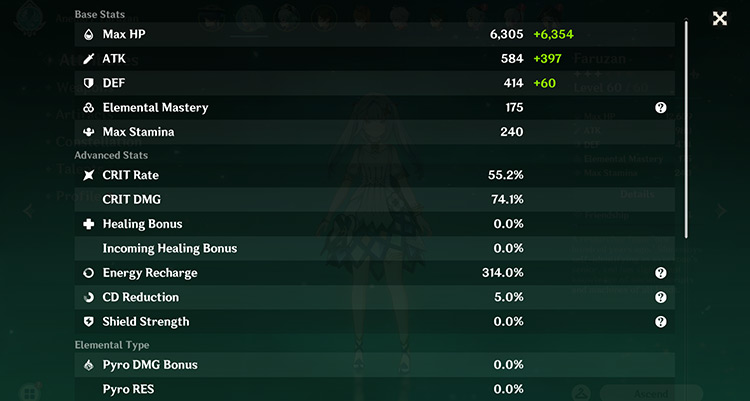
Faruzan’s Energy Recharge
Faruzan has very high energy requirements – building at least 300% Energy Recharge is your safest, most comfortable bet.
This is because she generates very few energy particles from her skill. It’s not enough to charge her expensive 80 energy cost burst every rotation, which is very important.
All of her buffing abilities come from her burst, so failing to charge it is a massive DPS loss.
Faruzan’s energy requirements will significantly decrease at C6, but it’s unlikely for most players to have this constellation. Building high amounts of ER is often your only choice.
Still, drafting additional Anemo units or using Favonius weapons can also help decrease her ER needs.
2. Heavily Relies on Constellations
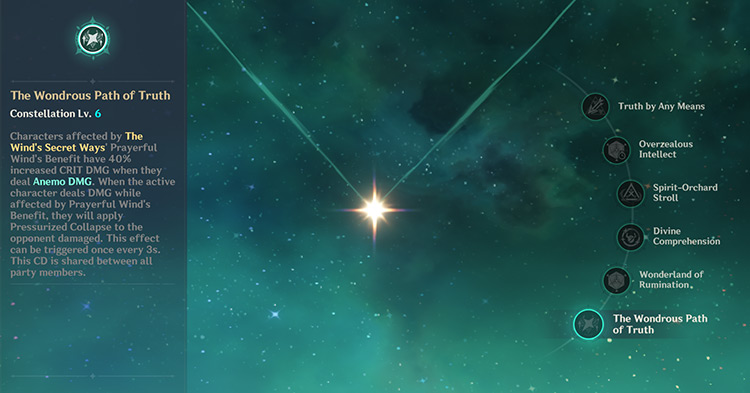
Faruzan’s C6
Faruzan works OK at C0, but her constellations make all the difference.
They significantly decrease her energy needs while also increasing her burst – or buffing – duration. It makes her a more comfortable unit to play and an even better support.
However, it’s relatively difficult to get specific 4-star constellations. Unlike 5-star units, there’s no way of guaranteeing Faruzan in your pulls.
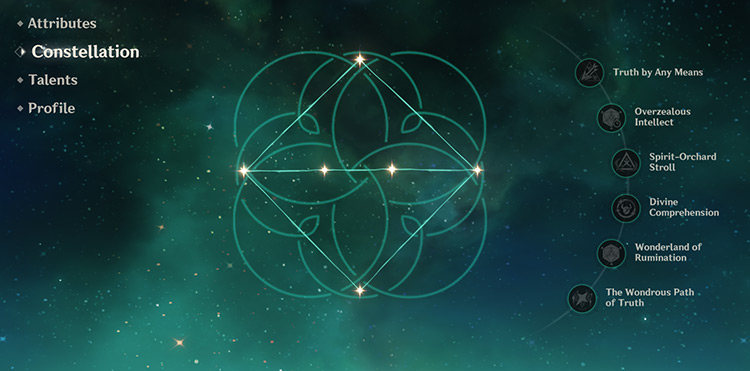
Are Faruzan’s Constellations Good?
Faruzan’s constellation screen
Faruzan has great constellations, and it’s highly recommended to pull for them – as long as you don’t mind getting the featured 5-star of that banner. This is because her cons offer significant buffs to her kit, including quality-of-life, utility, and damage.
Her best constellation by far is her C6, but it’s very expensive. There’s no way of guaranteeing 4-star copies from any gacha banner.
It’s simply not recommended to actively pull for C6 unless you were planning to get 5-star constellations from her featured banner.
Instead, her C2 is a more attainable goal to reach for. It increases the duration of her Anemo resistance shred and damage bonus – aka buffing your Anemo DPS for longer.
Plus she has a few other great constellations as well.
Let’s take a closer look at each one.
C1: Truth by Any Means
Faruzan can fire off up to 2 Hurricane Arrows using fully-charged aimed shots after casting her skill.
This is mainly an additional source of crowd control and a minor damage gain. But it’s generally not recommended to use both arrows since the second arrow doesn’t generate additional energy particles.
So it’s often a waste of field time – and the small damage increase gained from it isn’t enough to justify the cast time.
C2: Overzealous Intellect
Faruzan’s burst duration is increased by 6s.
This is easily one of her best constellations. It’s also the best and cheapest one to actively pull for since it’s a relatively early con.
C2 basically extends the buff duration provided by her burst – aka extending the buffs your Anemo DPS unit gains. It’s a great damage boost for every Anemo unit in your team.
C3: Spirit-Orchard Stroll
Increases her elemental skill talent by 3.
This is a small boost to her skill damage, but it’s generally not needed. She’s not built as a DPS, so leveling her skill and dealing personal damage isn’t her priority.
C4: Divine Comprehension
The vortex created by Pressurized Collapses will restore energy to Faruzan based on the number of enemies hit: If it hits 1 opponent, it will restore 2 energy. Each additional opponent hit will restore 0.5 more energy.
A maximum of 4 energy can be restored per vortex.
This is also one of her better constellations that gets better against AOE. It’s especially useful against multiple opponents where you can restore 4 energy per cast. It decreases a bit of her energy requirements.
C5: Wonderland of Rumination
Increases her elemental burst talent level by 3.
This is a respectable upgrade to her buffing abilities and burst damage. It’s an overall good constellation, and it brings you closer to C6.
C6: The Wondrous Path of Truth
Characters affected by Faruzan’s burst will have 40% increased CRIT Damage when they deal Anemo damage. When the active character deals damage while affected by her burst, they will apply Pressurized Collapse to the opponent damaged.
This can only be triggered once every 3s, and its cooldown is shared between all party members.
C6 is Faruzan’s best and strongest constellation.
It significantly reduces her energy requirements, upgrades her buffing abilities, provides additional crowd control, and increases her personal damage.
This constellation also retroactively makes her C3 and C4 better. It now justifies building her for damage (since you have much lower ER needs) and lets her proc her C4 much more often.
Maeri is an avid gacha player currently in the clutches of Genshin Impact. She mainly focuses on character analyses, underlying game mechanics, and occasionally reading game code. She also yearns for the day that Dainsleif is finally playable.


")
")
")
")
")
")
")