This post may contain affiliate links. If you buy something we may get a small commission at no extra cost to you. (Learn more).
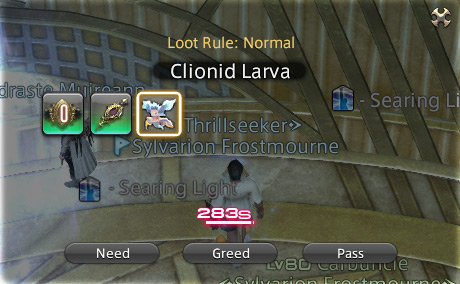
You can get the Clionid Larva minion by completing the dungeon Akadaemia Anyder and winning the loot from the final treasure coffer of the dungeon.
At the end of the dungeon, you will be able to open a treasure coffer with a chance to contain the minion along with a few other rewards.
However, the minion is not a guaranteed drop, so you may need to run the dungeon a few times to have a chance at getting the minion.
To access Akadaemia Anyder, you must first complete the “Shadowbringers” Main Scenario Quest from Alisaie at The Tempest (X:16.5, Y:30.4). This quest is part of the Patch 5.0 Shadowbringers storyline. So you should have finished every quest prior to “Shadowbringers” before you can unlock the dungeon.
Where To Unlock Akadaemia Anyder
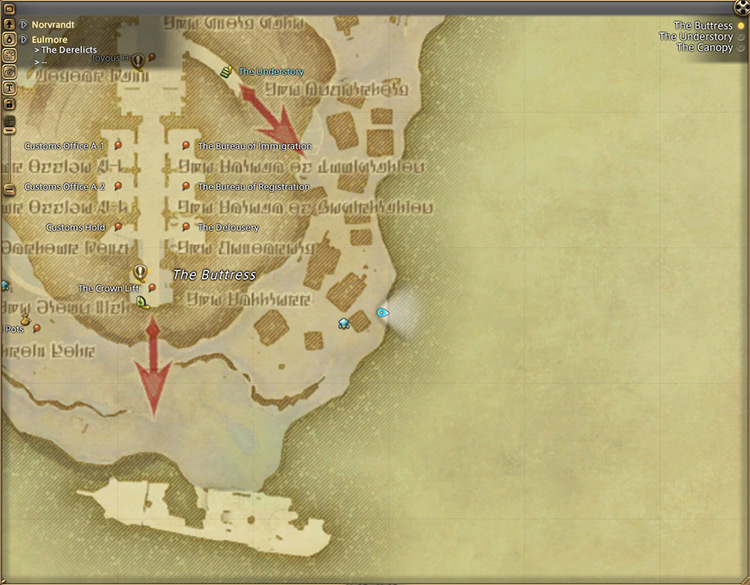
Overwrought Ondo Location screenshot
Once you have finished the “Shadowbringers” quest, you will be able to accept a quest called “Akadaemia Anyder” from Overwrought Ondo in Eulmore (X:12.9, Y:12.4).
To quickly find Overwrought Ondo:
Teleport to the main “Eulmore” Aetheryte Plaza under the Norvrandt tab
Once you have arrived, go to the Aetheryte once again and select “Aethernet”
Under “Eulmore (The Buttress),” select “Southeast Derelicts”
Overwrought Ondo will ask for your help in entering Amaurot to confront a great beast. The Ondo tribe believes that they have somehow incurred the wrath of the ancients.
After listening to his description of the great beast, you will need to go to the Bureau of the Administrator in Amaurot to report what happened.
Teleport to The Macarenses Angle in The Tempest and speak with the Administrative Clerk (X:21.4, Y:26.8).
After describing the beast to the clerk, they will ask you to head over to the Bureau of the Architect, as the beast may be one of the new types of fauna that researchers in Akadaemia Anyder have created.
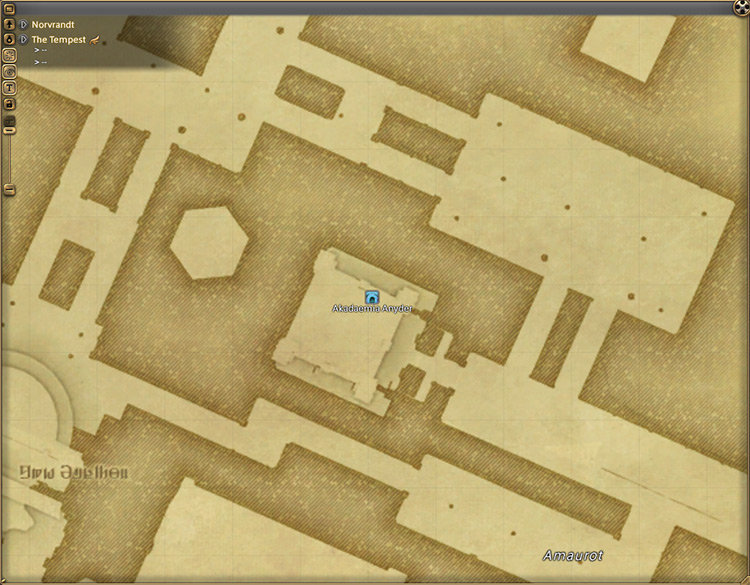
Akadaemia Anyder Location screenshot
Head over and speak to the Akadaemia Academic at the Bureau of the Architect (X:20.0, Y:33.1).
The academic will confirm that the beast is indeed under their supervision, and will allow you to tour the grounds of Akadaemia Anyder. You will now be able to access the dungeon.
To enter the dungeon, you must meet the following requirements:
Have a minimum item level average of 410
Have a level 80 Disciple of War or Magic job
You can queue with your friends in a 4-person party or queue solo using the Duty Finder and wait for other players to join in.
Tip: To farm the minion faster, you can queue with a 4-person party and unsync the dungeon to remove stats and weapon restrictions.
How To Complete Akadaemia Anyder
Inside Akadaemia Anyder screenshot
Similar to other dungeons in the game, you will need to defeat three bosses in the dungeon with groups of mobs before each boss to complete it.
Here’s a quick rundown of the bosses, some of their notable mechanics, and their rewards:
Cladoselache and Doliodus
Caldoselache screenshot
Notable mechanics:
Doliodus will spawn after doing enough damage to Cladoselache. Afterward, Cladoselache will dive towards the edge of the platform. This swap also happens vice-versa. Always keep an eye on the edge of the platform to see where each shark may be spawning.
Tidal Guillotine: Large point-blank circular AoE from Caldoselache. It will also cast this skill when re-entering the field.
Casters and Healers should try to stay back as much as possible when Cladoselache is on the field. Melee-users should try to stay on the edge of the boss’s hitbox and be quick on their feet.
Pelagic Cleaver: Large frontal-cone AoE from Doliodus. It will also cast this skill when re-entering the field.
Try to stay away from Doliodus’ line of sight whenever it is on the field.
Rewards:
Name
Type
Rarity
Amaurotine Choker of Aiming
Necklace
Dungeon (Green)
Amaurotine Choker of Casting
Necklace
Dungeon (Green)
Amaurotine Choker of Fending
Necklace
Dungeon (Green)
Amaurotine Choker of Healing
Necklace
Dungeon (Green)
Amaurotine Choker of Slaying
Necklace
Dungeon (Green)
Amaroutine Earrings of Aiming
Earrings
Dungeon (Green)
Amaroutine Earrings of Casting
Earrings
Dungeon (Green)
Amaroutine Earrings of Fending
Earrings
Dungeon (Green)
Amaroutine Earrings of Healing
Earrings
Dungeon (Green)
Amaroutine Earrings of Slaying
Earrings
Dungeon (Green)
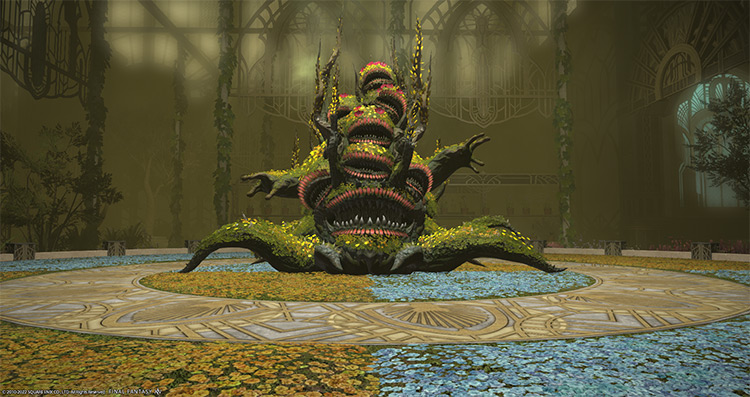
Marquis Morbol
Boss #2: Marquis Morbol screenshot
Notable mechanics:
Extensible Tendrils: Marquis Morbol’s tentacles will slam on the ground after some time.
When Marquis Morbol raises its tendrils, move in between its tendrils to avoid getting hit. The tendrils will slam on the ground repeatedly and change directions after every slam, so prepare to dodge accordingly.
Bile Vomit: Huge frontal-cone AoE without an indicator that also inflicts poison. Try to stay away from Marquis Morbol’s line of sight as much as possible throughout the entire encounter.
Rewards:
Name
Type
Rarity
Amaurotine Bracelets of Aiming
Bracelets
Dungeon (Green)
Amaurotine Bracelets of Casting
Bracelets
Dungeon (Green)
Amaurotine Bracelets of Fending
Bracelets
Dungeon (Green)
Amaurotine Bracelets of Healing
Bracelets
Dungeon (Green)
Amaurotine Bracelets of Slaying
Bracelets
Dungeon (Green)
Amaroutine Ring of Aiming
Ring
Dungeon (Green)
Amaroutine Ring of Casting
Ring
Dungeon (Green)
Amaroutine Ring of Fending
Ring
Dungeon (Green)
Amaroutine Ring of Healing
Ring
Dungeon (Green)
Amaroutine Ring of Slaying
Ring
Dungeon (Green)
Battledance Materia VII
Materia
Basic
Heaven’s Eye Materia VII
Materia
Basic
Piety Materia VII
Materia
Basic
Quickarm Materia VII
Materia
Basic
Quicktongue Materia VII
Materia
Basic
Savage Aim Materia VII
Materia
Basic
Savage Might Materia VII
Materia
Basic
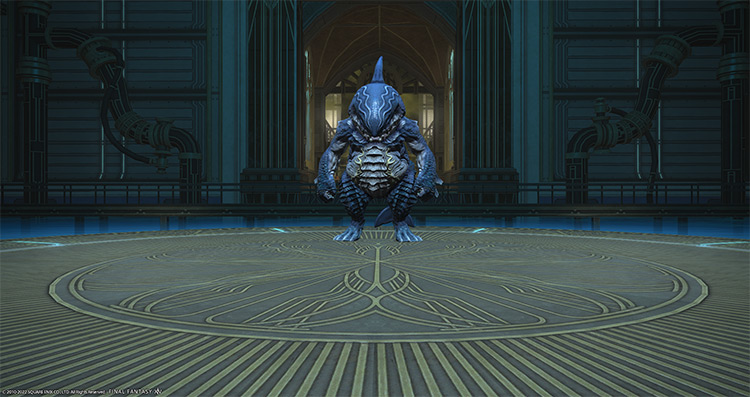
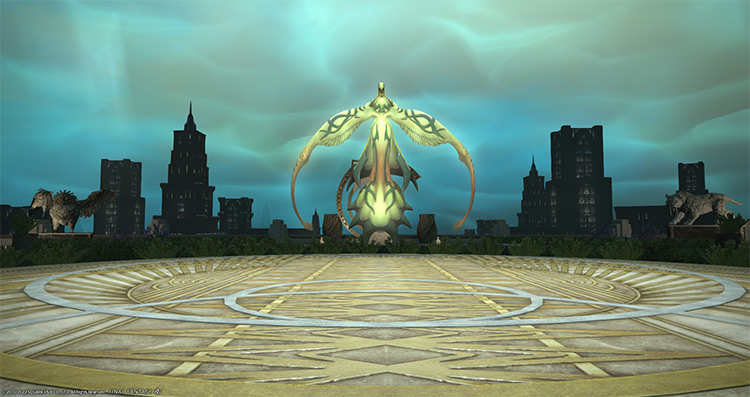
Guardian Force: Quetzalcoatl
Boss #3: Guardian Force: Quetzalcoatl screenshot
Notable mechanics:
Thunderstorm: Quetzalcoatl will place AoE markers on the ground and around every player. Spread out and move to open spaces to avoid overlapping damage.
Winding Current: Quetzalcoatl will place four expanding orbs around the platform. Then it will stun and knock players back to the opposite side of the platform.
Use Sprint to run towards the safe space underneath the boss quickly. Knockback immunity skills do not work against this attack.
Rewards:
Name
Type
Rarity
Amaurotine Choker of Aiming
Necklace
Dungeon (Green)
Amaurotine Choker of Casting
Necklace
Dungeon (Green)
Amaurotine Choker of Fending
Necklace
Dungeon (Green)
Amaurotine Choker of Healing
Necklace
Dungeon (Green)
Amaurotine Choker of Slaying
Necklace
Dungeon (Green)
Amaroutine Earrings of Aiming
Earrings
Dungeon (Green)
Amaroutine Earrings of Casting
Earrings
Dungeon (Green)
Amaroutine Earrings of Fending
Earrings
Dungeon (Green)
Amaroutine Earrings of Healing
Earrings
Dungeon (Green)
Amaroutine Earrings of Slaying
Earrings
Dungeon (Green)
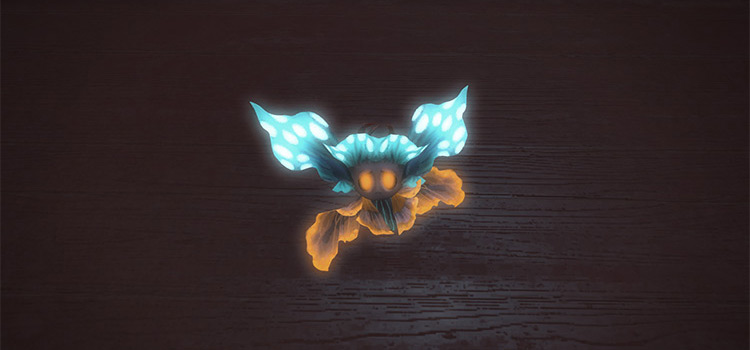
Clionid Larva
Minion
Basic
Shadows Withal Orchestrion Roll
Orchestrion Roll
Basic
Minion Drop & Other Rewards
Clionid Larva Minion Drop screenshot
Apart from the boss rewards, there are four treasure coffers located throughout the dungeon that you can open for more gear and materia rewards:
(X: 5.1 Y: 12.5)
(X: 6.0 Y: 11.9)
(X: 9.9 Y: 8.6)
(X: 10.6 Y: 6.6)
Familiarize yourself with the bosses’ mechanics and you will be able to farm this dungeon in no time.
Marc is a casual FFXIV Summoner veteran, retired TF2 Soldier main, and professional communicator. He's also a huge fan of anime, Hololive, and the Golden State Warriors.

")


")


")